If you look back at my posts over the years, it’s no secret that I’ve been on the hunt for a way to create forms that use WinUI 3 element styling. After many, many, failed attempts and rabbit holes I had largely given up hope… Until today.
Today Microsoft officially announced that WinUI 3 and WPF are the two recommended UI platforms for Windows. In particular, they stated that WPF is being updated with Windows 11 theming. So what exactly does that mean?
This sent me down a rabbit hole where I found an awesome GitHub Repo called WPF UI. Frankly, I’m not sure how I didn’t stumble upon this sooner, but nonetheless this repo is not your average 3rd party UI library. It was announced here and here that WPF UI and WPF would be officially collaborating to integrate this styling into the WPF library.
While the official WPF Windows 11 Theming project can be tracked here, I decided to take a stab at importing the current WPF UI library into Windows PowerShell.
Note: WPF UI is also available for .NET 6, 7, and 8 currently which also means it should be compatible with PowerShell 7!
Without further adieu, here are steps that can be followed to create your very own WPF form with WinUI styling:
- First off, you’re going to need the UI library itself. There are several ways to obtain this, but for this example you can navigate to the NuGet Package Explorer for this package: https://nuget.info/packages/WPF-UI/3.0.4
- In the file tree, expand lib then net481
- Remember that Windows PowerShell 5.1 is based on .NET Framework, whereas PowerShell 6/7 are based on .NET
- Double click on Wpf.Ui.dll and save to your project folder

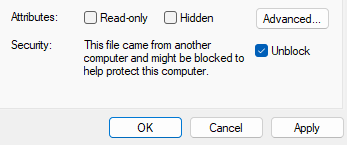
- Note: You will likely need to unblock the file, this can be done either via the right-click Properties menu or via the Unblock-File cmdlet
- That’s it! You’ve now got all you need to create and run this sample.
- Before I provide the code sample, I will highlight a few key components:
- At the top of your script, you must load the Wpf.Ui.dll types
Add-Type -LiteralPath "path\to\Wpf.Ui.dll"
- Your parent Window element must include the following namespace:
xmlns:ui="http://schemas.lepo.co/wpfui/2022/xaml"
- Finally, you must include the proper ResourceDictionary definitions (more on this below)
- At the top of your script, you must load the Wpf.Ui.dll types
Now, putting all of this together looks something like this:
Add-Type -LiteralPath "path\to\Wpf.Ui.dll"
#If using PowerShell 7, you will also need to load in the PresentationFramework for the Windows.Markup.XamlReader type.
Add-Type -AssemblyName PresentationFramework

[xml]$xaml = @"
<ui:FluentWindow
    xmlns="http://schemas.microsoft.com/winfx/2006/xaml/presentation"
    xmlns:x="http://schemas.microsoft.com/winfx/2006/xaml"
    xmlns:ui="http://schemas.lepo.co/wpfui/2022/xaml"
    x:Name="Window">

    <ui:FluentWindow.Resources>
        <ResourceDictionary>
            <ResourceDictionary.MergedDictionaries>
                <ui:ThemesDictionary Theme="Dark" />
                <ui:ControlsDictionary />
            </ResourceDictionary.MergedDictionaries>
        </ResourceDictionary>
    </ui:FluentWindow.Resources>

    <StackPanel>
        <ui:TitleBar Title="WPF UI Title Bar"/>
        <TextBlock Padding="10">This is a WPF window styled to look like WinUI 3!</TextBlock>
        <StackPanel Orientation="Horizontal" HorizontalAlignment="Center">
            <TextBox x:Name="MyTextBox" Width="150" />
            <ui:Button x:Name="SubmitButton" Content="Submit" Margin="5" />
        </StackPanel>
    </StackPanel>
</ui:FluentWindow>
"@

$reader = (New-Object System.Xml.XmlNodeReader $xaml)
$window = [Windows.Markup.XamlReader]::Load($reader)

<# We won't add events in this example, but here are some examples for finding the elements
$submitButton = $window.FindName("SubmitButton")
$textbox = $window.FindName("MyTextBox")
#>

$window.ShowDialog()
While this is so awesome, I think part of the appeal of WPF and WinForm UI creation within PowerShell is the simplicity and lack of 3rd party dependencies. I will definitely be keeping a close eye on the official WPF project once it is updated (expected ~November 2024) to revisit this, but until then this is the closest thing to WinUI styles with PowerShell. Enjoy!
Update: 8/27/2024 – New post is LIVE! https://blog.nkasco.com/wordpress/index.php/2024/08/27/how-to-use-winui-3-styles-with-wpf-forms-in-powershell-net-9/
Definitely need to give a special shout out to Microsoft MVP Violet Hansen (https://github.com/HotCakeX). Her and I have been pretty aggressively posting all over looking for a way to use WinUI styles with PowerShell and today we finally found it.
